Mastering Ethernet Cable Connector Wiring: A Step-by-Step Guide
Dec 9, 2025
19 min read
So, you need to wire up some Ethernet cables and are looking for a straightforward guide? You've come to the right place. Making your own Ethernet cables might seem a bit daunting at first, especially with all the talk about specific wiring standards and tools. But honestly, it's totally doable. We're going to break down the whole process of ethernet cable connector wiring, from getting the right gear to making sure your connections are solid. Think of this as your no-fuss manual to getting it done right, the first time.
Key Takeaways
Gather your tools: You'll need a wire stripper, a good crimping tool, and the RJ45 connectors themselves to start ethernet cable connector wiring.
Prep the cable: Carefully strip the outer jacket, manage any shielding, and then untwist the wire pairs just enough to work with them.
Follow the standard: Stick to either the T568A or T568B wiring standard for consistent and reliable connections.
Crimp and test: Insert the wires correctly into the RJ45 connector, crimp it firmly, and always test your finished cable to make sure it works.
Keep it neat: Maintain the twist in the wire pairs as much as possible and avoid sharp bends in the cable for better performance.
Essential Tools for Ethernet Cable Connector Wiring
Alright, so you're looking to get your hands dirty with some Ethernet cable wiring. It's not rocket science, but you definitely need the right gear to make it happen without a ton of frustration. Trying to do this with just a butter knife and some pliers? Yeah, that's a recipe for a bad time, trust me.
Gathering Your Wiring Toolkit
Before you even think about touching a cable, let's talk about what you actually need. It's a pretty short list, but each item plays a big role. Get these wrong, and your whole project can go sideways fast.
Ethernet Cable: Obviously, you need the cable itself. Make sure it's the right category (like Cat5e, Cat6, or Cat6a) for what you're trying to do. Don't skimp on quality here; a cheap cable can cause headaches later.
RJ45 Connectors: These are the little plastic plugs that go on the ends of the cable. You'll need one for each end you're terminating. Make sure they match your cable category.
Crimping Tool: This is the main event for attaching the connector. It's what actually squishes the connector onto the wires.
Wire Stripper: You need this to carefully remove the outer jacket of the cable without nicking the wires inside.
Cable Tester: Once you're done, you absolutely need to test your work. This little gadget tells you if you messed up.
Understanding Wire Stripper Functionality
So, a wire stripper might seem straightforward, but there's a bit more to it than just yanking off the plastic. The goal here is to get just enough of the outer jacket off to expose the inner wires, but not damage those delicate inner wires. Some strippers have adjustable collars or blades that let you set the depth. This is super handy because you don't want to cut too deep and sever the insulation on the individual twisted pairs. A good stripper will make a clean cut around the jacket, allowing you to easily pull it off.
The trick with stripping is to remove just enough of the outer jacket to work with the inner wires, typically about an inch to an inch and a half. You want to leave the twists in the pairs as close to the jacket as possible, as this helps maintain signal integrity.
Selecting the Right Crimping Tool
This is where you really make the connection happen. A crimping tool is designed to push the tiny metal pins inside the RJ45 connector down onto the copper conductors of the Ethernet cable. A quality crimping tool will ensure a secure, reliable connection that won't easily pull apart. There are a few types out there, but for most people, a manual crimper is perfectly fine. Some even have built-in cutters and strippers, which can be convenient. When you're crimping, you want to apply firm, consistent pressure. A tool that feels flimsy or doesn't give a solid 'crimp' might leave you with a connection that fails later on. Look for one that feels sturdy in your hand and has a mechanism that feels like it's doing the job properly.
Preparing the Ethernet Cable for Termination
Alright, so you've got your cable, and you're ready to put an end on it. Before we get to the fun part – the actual crimping – we need to get the cable ready. This stage is super important because if you mess this up, your whole cable might not work right. It’s all about being careful and precise.
Stripping the Outer Jacket Safely
First things first, you need to get rid of that outer plastic coating, but you don't want to go too deep. If you cut into the wires inside, you're going to have problems. Most cable strippers have a little blade that you can adjust, or they're set to a specific depth. You want to cut just deep enough to go through the jacket, not the wires. A good rule of thumb is to strip off about an inch to an inch and a half of the jacket. This gives you enough room to work with the wires inside without making the cable too short.
Managing Shielding and Braiding
Now, depending on your cable type, you might find some extra stuff inside besides the four color-coded pairs. Some cables have a foil shield wrapped around the pairs, and others have a braided metal shield, or both. If you have shielding, you'll need to deal with it. Usually, you'll fold the braided shield back over the outer jacket, and trim the foil shield away. The goal here is to get rid of the shielding material so it doesn't interfere with the RJ45 connector, but you have to be really careful not to nick or cut the insulation on the actual wires. It’s a bit fiddly, but necessary for a clean connection.
Untwisting Wire Pairs Precisely
Inside that jacket, you'll see four pairs of wires, all twisted together. These twists are there for a reason – they help reduce interference. You'll need to untwist them to arrange them for the connector, but you don't want to untwist them any more than you absolutely have to. Try to keep the twists going as close to the end as possible, maybe leaving about half an inch of untwisted wire. This helps maintain the cable's performance. Then, carefully separate each of the eight wires and straighten them out a bit so you can arrange them in the correct color order.
Understanding Ethernet Wiring Standards
Alright, so you've got your cable, you've stripped it back, and you're looking at all those colorful wires. Now what? This is where wiring standards come into play. Think of them as the secret handshake for your network cables. Without them, your devices wouldn't know how to talk to each other properly.
T568A vs. T568B: Key Differences
Basically, there are two main ways to arrange those eight wires inside the RJ45 connector: T568A and T568B. They both use the same eight wires, but they swap the positions of the orange and green wire pairs. It might not sound like a big deal, but it matters.
Here’s a quick look at how they line up:
Pin | T568A Standard | T568B Standard |
|---|---|---|
1 | White/Green | White/Orange |
2 | Green | Orange |
3 | White/Orange | White/Green |
4 | Blue | Blue |
5 | White/Blue | White/Blue |
6 | Orange | Green |
7 | White/Brown | White/Brown |
8 | Brown | Brown |
The biggest difference is that the orange and green pairs swap places between the two standards. If you accidentally mix them up on the same cable, you'll end up with what's called a crossover cable, which is only useful for very specific direct connections between two similar devices, like two computers.
Choosing the Correct Standard for Your Network
So, which one should you use? For most home and office networks today, T568B is the most common standard. You'll find it used in most pre-made patch cables you buy off the shelf. It's kind of the de facto industry standard for commercial buildings.
T568A, on the other hand, is sometimes preferred because it's the official standard used by the U.S. government and can be a bit more compatible with older telephone wiring systems. It's also common in some residential setups.
Here's the golden rule: pick one standard and stick with it throughout your entire network installation. Mixing them on purpose is how you make a crossover cable, but if you mix them by accident, you'll just get a cable that doesn't work right.
Identifying Signal Pairs for Termination
Ethernet cables have four twisted pairs of wires. These twists are super important because they help reduce interference and crosstalk, which can mess with your internet speed. When you're terminating a cable, you want to keep those twists as tight as possible, right up to the point where they go into the connector. Usually, you don't want more than about half an inch (or 1.3 cm) of untwisted wire.
The four pairs are:Blue pairOrange pairGreen pairBrown pair
When you're looking at the wires, you'll see one solid color wire and one striped wire (like white with a blue stripe) making up each pair. For T568B, the orange pair goes to pins 1 and 2, and the green pair goes to pins 3 and 6. For T568A, it's the other way around: green to pins 1 and 2, and orange to pins 3 and 6. The blue and brown pairs stay in the same spots for both standards.
Step-by-Step Ethernet Cable Connector Wiring
Alright, let's get down to actually putting these connectors on. It might seem a little fiddly at first, but once you get the hang of it, it's pretty straightforward. The key here is being organized and paying attention to the details. Mess this part up, and your network connection will be about as reliable as a chocolate teapot.
Arranging Wires in the Correct Color Order
This is where you need to know your standards. Whether you're going with T568A or T568B, you've got to get the colors in the right sequence. Remember, each pair has a solid color wire and a white wire with a stripe of that color. You'll untwist them just enough to lay them out flat. For T568B, which is super common, the order from left to right (if you're holding the connector with the clip facing away from you) is: White/Orange, Orange, White/Green, Blue, White/Blue, Green, White/Brown, Brown. It's a bit of a mouthful, I know. Just double-check it against your standard before you move on.
Trimming Wires to the Optimal Length
Once you've got your wires lined up perfectly, you need to trim them. You don't want them too long, or they won't seat properly in the connector. You also don't want them too short, or they won't reach the end. Aim for about half an inch (around 1.25 cm) of exposed wire from the jacket. Use a sharp pair of wire cutters or the cutting edge on your crimping tool. Make sure all eight wires are cut to the exact same length. This is super important for getting a good connection.
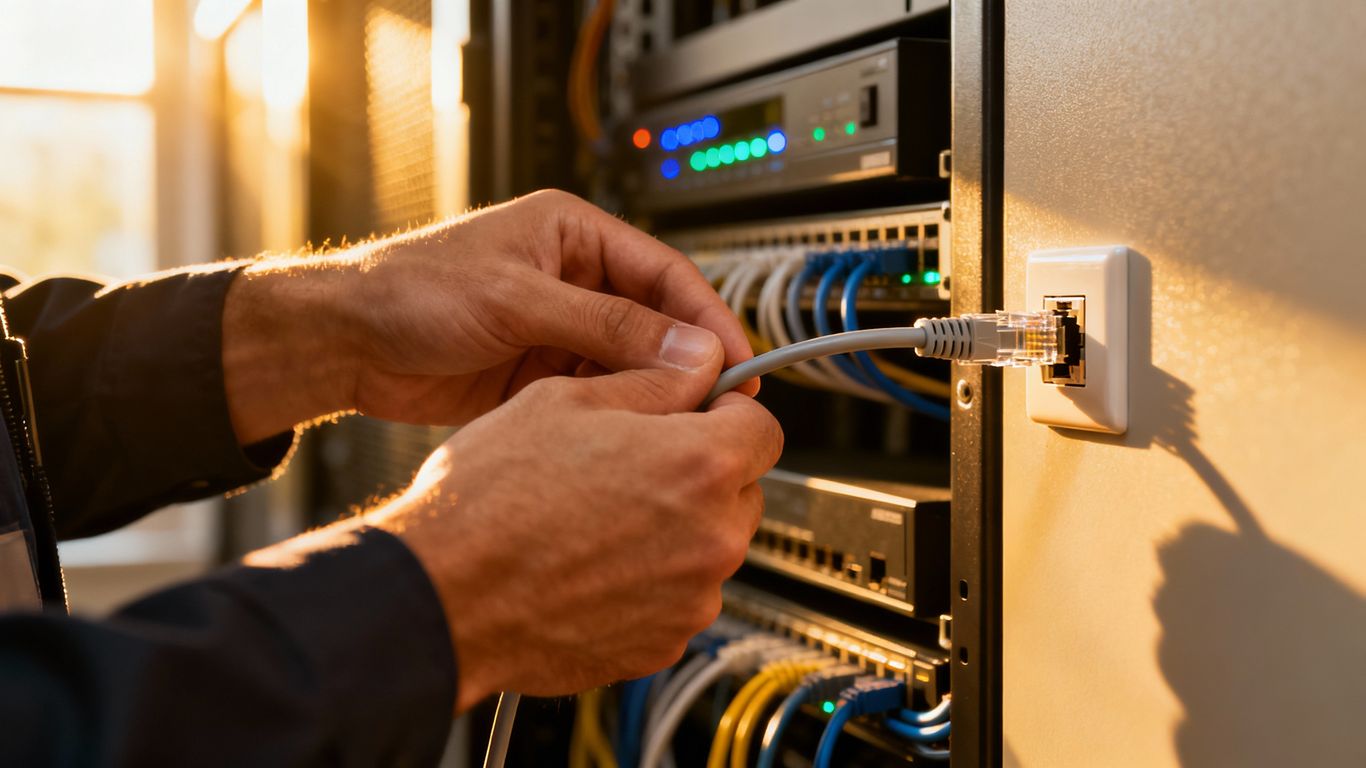
Inserting Wires into the RJ45 Connector
Now for the moment of truth. Carefully pick up the arranged and trimmed wires, keeping them in their order. Gently slide them into the RJ45 connector. You want each wire to go into its own little channel. Push them in until they reach the very end of the connector. You should be able to see the colored wires poking out slightly through the clear tip of the connector. This is your visual confirmation that they've gone all the way in. If any wire doesn't seem to be reaching the end, gently pull it back and try again. Make sure the outer jacket of the cable also gets seated inside the connector body; this is what provides strain relief.
The Crimping Process for Secure Connections
Alright, so you've got your wires all lined up, looking neat and tidy in the RJ45 connector. Now comes the part that really makes it all stick: the crimp. This is where the magic happens, turning those individual strands into a solid, reliable connection. It's not just about squeezing the connector; it's about making sure everything is seated just right.
Executing the Crimp with Precision
This is the moment of truth. You'll take your RJ45 connector, with the wires already in place, and slide it into the dedicated slot on your crimping tool. Give it a firm, steady squeeze. You're not trying to break anything, but you do need enough pressure to make it happen. The tool is designed to push down those little metal pins inside the connector, piercing the insulation on each wire and making contact with the copper conductor. A good crimp feels solid and definitive. You'll often hear a little click or feel a distinct stop when it's done properly.
Ensuring Jacket Security within the Connector
Don't forget about the outer jacket of your Ethernet cable. It's not just there for looks; it provides strain relief and helps protect the wires inside. When you're crimping, the tool should also clamp down on that outer jacket, gripping it firmly within the back of the RJ45 connector. This prevents the cable from being pulled out easily and stops the wires from bending sharply right at the connector's edge, which is a common failure point. If the jacket isn't secured, the whole connection is much weaker.
Recognizing a Proper Crimp
So, how do you know you've done it right? Well, a proper crimp means a few things. First, the connector should feel firmly attached to the cable, with no wiggle room. Visually, you should see that the metal pins inside the connector have been pushed down, making contact with the wires. If you used a pass-through connector, you might even see the wire ends sticking out slightly from the front, all trimmed cleanly by the tool. The outer jacket should be held tight by the connector's strain relief mechanism. If any of these aren't right, it's worth doing it again. It's better to redo a connection now than to have network issues later.
A common mistake is not pushing the wires far enough into the connector before crimping. This leads to the metal pins not making proper contact with the copper inside the wires, resulting in intermittent or no connection at all. Always double-check that the wires are fully seated and aligned before you apply the crimp.
Testing Your Terminated Ethernet Cables
So, you've gone through all the steps, carefully arranged those tiny wires, and given the connector a good crimp. Awesome! But how do you know if it actually works, or if it's going to cause you headaches down the line? That's where testing comes in. It's not just a good idea; it's pretty much a requirement if you want a network that doesn't randomly drop connections or run at dial-up speeds.
Utilizing an Ethernet Cable Tester
Think of an Ethernet cable tester as your quality control inspector. These gadgets are relatively simple to use, and they're a lifesaver. You plug one end of your newly made cable into the main unit and the other end into the remote unit. Then, you just hit a button. The tester checks each of the eight conductors to make sure they're connected in the right order and that there are no shorts or open circuits. Most testers will light up a series of LEDs, usually numbered 1 through 8, to show the path of the connection. If the lights on both the main and remote units light up in sequence (1, 2, 3, 4, 5, 6, 7, 8), you've likely got a good connection. If they're out of order, or some don't light up at all, something's not right.
Interpreting Test Results for Reliability
Getting a sequential light-up is great, but what does it really mean for your cable's reliability? A tester that shows a perfect 1-8 sequence on both sides means your wires are correctly mapped and there are no breaks. This is your baseline for a functional cable. However, some testers can show more complex issues. For instance, a 'split pair' might show up as lights 1 and 3 lighting up simultaneously on one end, but then 3 and 1 on the other. This means two wires that should be twisted together have been accidentally swapped. While the cable might still work at slower speeds (like 100Mbps), it's a ticking time bomb for performance issues at higher speeds (1Gbps or more) and should be redone.
Here's a quick rundown of what different results might indicate:
All lights 1-8 sequence: Good to go! Your cable is wired correctly.
Missing lights or no lights: An open circuit. One or more wires aren't making contact. You'll need to re-terminate.
Lights out of order: A crossed pair. The wires are connected, but in the wrong sequence. Re-terminate.
Simultaneous lights (split pair): A common issue where pairs are mixed up. Re-terminate.
Troubleshooting Common Wiring Failures
If your tester throws a fit, don't panic. Most problems are pretty straightforward to fix. The most frequent culprit is a wire that didn't quite make it to the end of the RJ45 connector. This often results in a missing light on the tester. You might need to pull the connector off and try again, making sure to push the wires all the way in before crimping. Another common issue is not keeping the wire pairs twisted enough before insertion. This can lead to split pairs or crossed connections, especially with the smaller wires like brown and blue. If you're using shielded cable, double-check that the shield is making good contact with the connector's grounding mechanism.
When you're testing, remember that the tester is only as good as the cable you've made. If the tester itself is faulty, or if you're using a very basic model that doesn't check for split pairs, you might miss subtle problems. For critical installations, consider using a more advanced cable certifier that can measure signal integrity, attenuation, and crosstalk, giving you a much clearer picture of the cable's performance capabilities.
Ultimately, testing is your final checkpoint. It's the step that separates a "maybe it works" cable from a "definitely works" cable, saving you time and frustration later on.
Best Practices for Reliable Ethernet Cable Connector Wiring
Alright, so you've gotten through the tricky parts of stripping and arranging those tiny wires. Now comes the part where you want to make sure all that effort actually sticks. It’s not just about getting the colors right; it’s about making a connection that’s going to last and perform well. Think of it like building something – you want it to be sturdy, right?
Maintaining Wire Pair Twists
This is a big one, seriously. Those wire pairs aren't just twisted for looks. They're twisted to help cancel out interference, which is basically noise that can mess with your data signal. When you untwist them too much, especially near the connector, you're basically inviting that noise in. So, the rule of thumb is to keep them twisted as close to the connector as possible. Only untwist them right at the end, just enough to get them into the connector slots. We're talking about maybe half an inch, tops.
Adhering to Bend Radius and Tension Guidelines
Cables have limits, you know? You can't just bend them into a tight little circle or yank on them like a dog toy. Each type of Ethernet cable has a minimum bend radius – that's the tightest curve you can make without damaging the internal wires or the shielding. For most Cat5e and Cat6 cables, this is usually around four times the cable's diameter. Also, don't pull too hard when you're running the cable or terminating it. Excessive tension can stretch the wires, which messes with their performance and can even break them.
Consistent Application of Wiring Standards
This might sound obvious, but you'd be surprised how often it gets overlooked. Pick a standard – either T568A or T568B – and stick with it for every single cable in your installation. Mixing them up on different ends of the same cable creates a crossover cable, which is usually not what you want unless you're connecting two of the same type of device (and even then, most modern gear handles this automatically). Using the same standard on both ends (a straight-through cable) is the most common setup for connecting devices to switches or routers. Consistency makes troubleshooting way easier down the line. If you ever have to trace a problem, knowing every cable follows the same pattern is a lifesaver.
Making a good Ethernet cable connection isn't just about following a diagram; it's about respecting the physical properties of the cable and the electrical principles at play. Small details, like maintaining twists and avoiding sharp bends, have a significant impact on the final performance and reliability of your network.
Advanced Techniques in Ethernet Wiring
Alright, so you've got the basics down, but what about when things get a little more complex? We're talking about those situations where standard connections just won't cut it, or you want to make your life a whole lot easier. Let's look at some of the more advanced ways to handle Ethernet wiring.
Pass-Through Connectors for Beginners
If you've ever struggled with getting all the wires perfectly aligned and seated in a traditional RJ45 connector, you're not alone. Pass-through connectors are a game-changer, especially for those still getting the hang of things. With these, the wires actually poke out the front of the connector after you've arranged them in the correct order. This makes it super easy to see if you've got them all lined up right before you crimp. The crimping tool then trims off the excess wire flush with the connector face. It's a really forgiving method that helps reduce errors and makes for a cleaner termination. This simple innovation significantly lowers the learning curve for creating reliable network cables.
Shielded Connectors in High-Interference Environments
Most of the time, the standard unshielded twisted-pair (UTP) cables and connectors are perfectly fine. But what happens when your network runs near heavy machinery, fluorescent lights, or other sources of electromagnetic interference (EMI)? That's where shielded connectors come into play. These connectors, designed to work with shielded Ethernet cable, provide an extra layer of protection. They have a metal casing that grounds the cable's shielding, helping to block out unwanted noise that could mess with your data signals. For critical applications or environments known for electrical "noise," using shielded connectors is a smart move to maintain signal integrity. It's all about optimizing network performance when the conditions aren't ideal.
Strain Relief and Jacket Securing
This might seem minor, but it's actually pretty important for the longevity of your cables. When you terminate an Ethernet cable, you want to make sure the outer jacket is properly secured inside the connector. This is what provides strain relief, meaning it prevents the individual wires from being pulled or bent sharply right at the connector point. If the jacket isn't secured, repeated flexing or tension on the cable can break the delicate wires inside, leading to intermittent connection issues or complete failure. A good crimp not only connects the wires but also clamps down on that outer jacket, giving the cable some much-needed support and preventing premature wear and tear. It's a detail that separates a professional installation from a DIY job that might fail down the line.
Safety Considerations During Wiring
Alright, let's talk about staying safe while you're wiring up those Ethernet cables. It might seem like a simple task, but there are a few things to keep in mind, especially with newer technologies.
Handling PoE Circuits Safely
Power over Ethernet, or PoE, is pretty neat. It lets you send power and data over the same cable, which is super handy for things like IP cameras or wireless access points. But here's the thing: some PoE standards can push a lot of power, up to 90 watts. That's enough to give you a nasty shock if you're not careful.
Always make sure the power is off before you start messing with any cables that might be carrying PoE. Seriously, double-check. It's better to be safe than sorry.
If you're working in an area where PoE is active, wear protective gear. Think gloves and maybe even safety glasses.
Don't assume a cable is dead just because it looks like it.
Preventing Conductor Exposure
When you're stripping wires and getting them ready for the connector, it's easy to accidentally nick or damage the insulation on the individual conductors. If that happens, you could end up with exposed wires. This is bad news for a couple of reasons. First, it can lead to short circuits, which will mess up your network. Second, if you're dealing with PoE, those exposed conductors could be live, creating a shock hazard. Take your time when stripping the outer jacket and untwisting the pairs to avoid nicking the inner wires.
Using Protective Equipment
This ties into the other points, but it's worth repeating. Having the right gear makes a big difference. A good pair of wire strippers with a depth guard is a must. It helps you avoid cutting too deep and damaging the conductors. Also, having a decent pair of flush cutters for trimming wires is helpful. If you're working in a tight space or a potentially hazardous environment, don't skip the gloves and eye protection. It's just common sense, really. For more on getting the right gear, you might want to look into residential Ethernet installation.
Working with network cables, especially those carrying power, requires a mindful approach. Rushing the process or using dull tools increases the risk of errors and accidents. Always prioritize a clear workspace and a calm demeanor. If a connection feels tricky, take a break and reassess rather than forcing it.
When working with wires, safety is super important. Always make sure the power is off before you start any wiring job. Double-check your connections to prevent any problems down the road. For more tips on safe wiring and other tech solutions, visit our website!
Wrapping It Up
So, there you have it. Wiring your own Ethernet cables might seem a little tricky at first, but with the right tools and a bit of patience, it’s totally doable. We’ve gone over the tools you’ll need, the different wiring standards, and the step-by-step process to get those connectors attached. Remember to take your time, double-check those wire colors, and always test your finished cables. Doing it yourself can save you some cash and give you a real sense of accomplishment. Plus, you’ll know your network connections are solid because you made them yourself.
Frequently Asked Questions
What tools do I absolutely need to wire an Ethernet cable?
To get started, you'll need a few key tools. First, a wire stripper is important for taking off the outer plastic coating without hurting the tiny wires inside. Then, you'll need a crimping tool, which is like a special plier that squishes the connector onto the cable end. Lastly, you'll need the RJ45 connectors themselves and the Ethernet cable you want to wire.
What's the difference between T568A and T568B?
T568A and T568B are just two different color codes for arranging the eight wires inside an Ethernet cable. Think of them like two different ways to put the same puzzle pieces together. For most home and office networks, it doesn't matter which one you use, as long as you use the same one on both ends of the cable. However, some government jobs require T568A.
How do I know if I wired the cable correctly?
The best way to check your work is by using an Ethernet cable tester. You plug one end of the cable into the tester and the other end into a small remote piece. The tester lights up to show if all the wires are connected in the right order. If any lights are out of order or don't light up, you know there's a problem with how you wired it.
Why is it important to keep the wire pairs twisted?
The wires inside an Ethernet cable are twisted together in pairs for a reason! This twisting helps block out unwanted signals, like radio waves or signals from other wires, which can mess with your internet speed. It's called 'interference.' So, you want to keep those pairs twisted as much as possible, only untwisting them right at the very end when you put them into the connector.
Can I reuse an RJ45 connector if I mess up?
It's generally not recommended to reuse an RJ45 connector. Once you crimp it onto the cable, it's pretty much stuck there. Trying to pull it off can damage the connector or the wires, leading to a bad connection later on. It's usually best to just grab a new connector and start fresh to ensure a reliable link.
What does 'crosstalk' mean in Ethernet cables?
Crosstalk is basically when the signal from one wire pair 'leaks' over to another wire pair. This can happen if the wires aren't twisted correctly or if they're too close together. It's like hearing someone else's conversation when you're on the phone. Keeping the twists tight and following the wiring standards helps prevent this.
How much of the outer jacket should I strip off?
You typically want to strip off about an inch to an inch and a half of the outer plastic jacket. This gives you enough room to work with the inner wires. Just be super careful not to cut into the insulation of the smaller wires underneath when you're stripping the jacket.
What is Power over Ethernet (PoE) and do I need to worry about it?
Power over Ethernet, or PoE, means that the Ethernet cable can carry both internet data and electricity to power devices like cameras or Wi-Fi access points. If you're working with PoE, it's extra important to be careful. Make sure the power is off before you start wiring, and wear protective gear. Damaged cables could expose live wires, which is dangerous.